Pattern Demo
This walkthrough recreates the Pattern Demo scene in PhaserForge. It assumes you already completed Cloud Account Setup and are continuing in the normal signed-in path.
What You Will Build
- seven ship sprites arranged in two rows
- a text label above each ship
- one movement pattern attached to each ship
- background music
- a project that is ready for the GitHub Pages publish workflow in the next guide
Before You Start
- Open PhaserForge and sign in if needed.
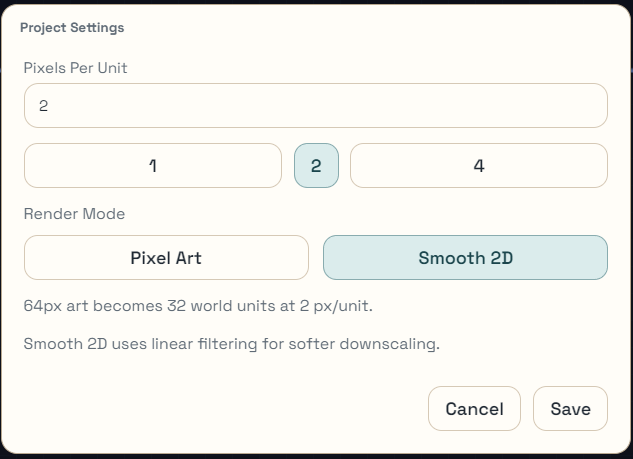
Figure 1. Project Settings dialog.
- Click the
Managebutton at the top of the Project Tree, then clickProject Settings. Ensure thatPixels per Unitis set to2, then either clickSaveorCancelas appropriate. - If you have other work going, reset to a new empty scene from the Project Tree in the upper left. Click
Manage -> Create New. - Stay in the same signed-in project flow you established during cloud account setup.
- Set the scene world size to
800 x 600and then theFitbutton to recenter and enlarge the viewport before you begin placing ships.

Figure 2. World Size dimensions (in pixels).
Success check:
- The canvas is empty and the scene graph does not show leftover sprites or formations.
- The World Size is
800 x 600, as shown in the Viewport panel (Figure 2), and the viewport is centered in the canvas.
Import the Demo Pack Assets
Using the Assets Dock at the bottom of the left sidebar, click "+ Add".
NOTE: A popup menu will appear.
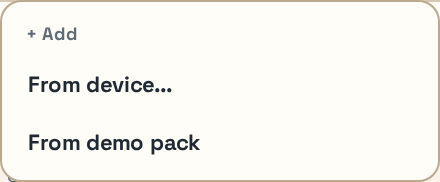
Figure 3. Assets Dock add menu showing the Demo Pack import option.
In the popup menu, select "From demo pack".
NOTE: A list of sprites with thumbnails will appear in the Assets Dock.
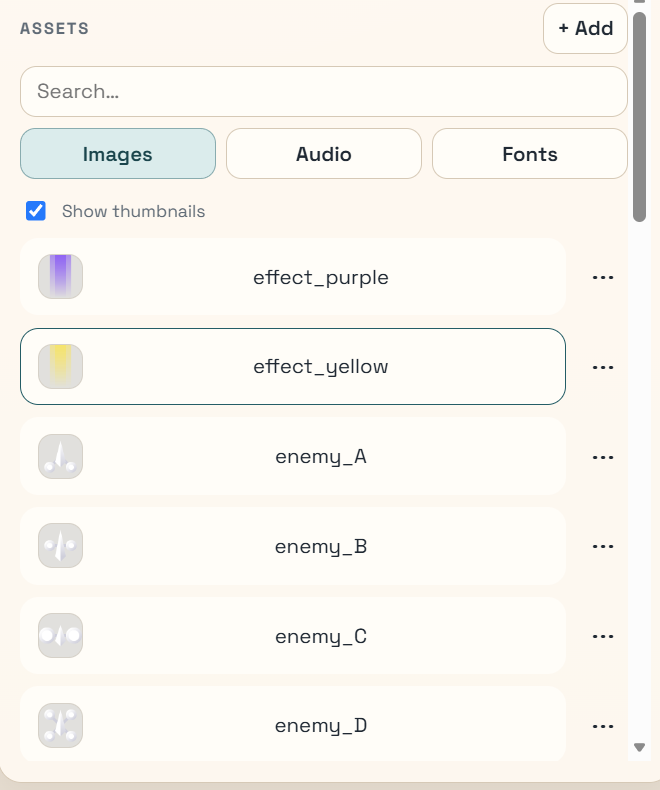
Figure 4. Assets Dock after importing the Demo Pack assets.
Add the Text Labels
In the left sidebar, under Scene Graph, click the "+ Add" button beside Text.
NOTE: This will create one text entity called 't'.
Rough-place the text entity (i.e., drag it) near the top-left quarter of the viewport.
Hit the F2 key and rename the text entity to "Wave"
Hit the F3 key and type in "Wave" as the text property of the highlighted entity.
NOTE: you should see the text change for the entity in the Canvas.
Repeat steps 1-4 for each of the sprites in the top and bottom rows until you have named labels spread out from left to right in each row.
- top row:
Wave,Zigzag,Figure-8,Orbit - bottom row:
Spiral,Bounce,Patrol
- top row:
Select the
Wavelabel. In the Inspector's Transform panel, setX = 130andY = 120. This anchors the label row to the same center point the first top-row ship will use later.

Figure 5. On-canvas selection bar for multi-selection actions.
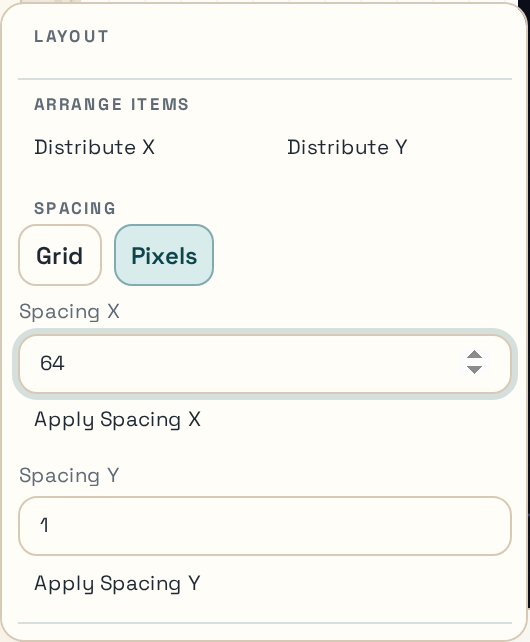
Figure 6. Layout popover for spacing and set-position operations.
Drag-select the top-row labels, and in the popup Selection Bar, use
Layout …:- Under Spacing, click
Pixels, then type180in theSpacing Xbox, and clickApply Spacing X. - Under Advanced, level the labels with
Match top edges. - Click the "Close" button at the bottom of the Layout popup, or just click in a blank area of the canvas to close it.
- Under Spacing, click
Click a blank space somewhere in the canvas to deselect the top-row labels.
Select the
Spirallabel. In the Inspector's Transform panel, setX = 220andY = 340. This anchors the bottom label row to the same center point the first bottom-row ship will use later.Drag-select the bottom-row labels, and in the popup Selection Bar, use
Layout ….- Under Spacing, click
Pixels, then type180in theSpacing Xbox, and clickApply Spacing X. - Under Advanced, level the labels with
Match top edges. - Click the "Close" button at the bottom of the Layout popup, or just click in a blank area of the canvas to close it.
- Under Spacing, click
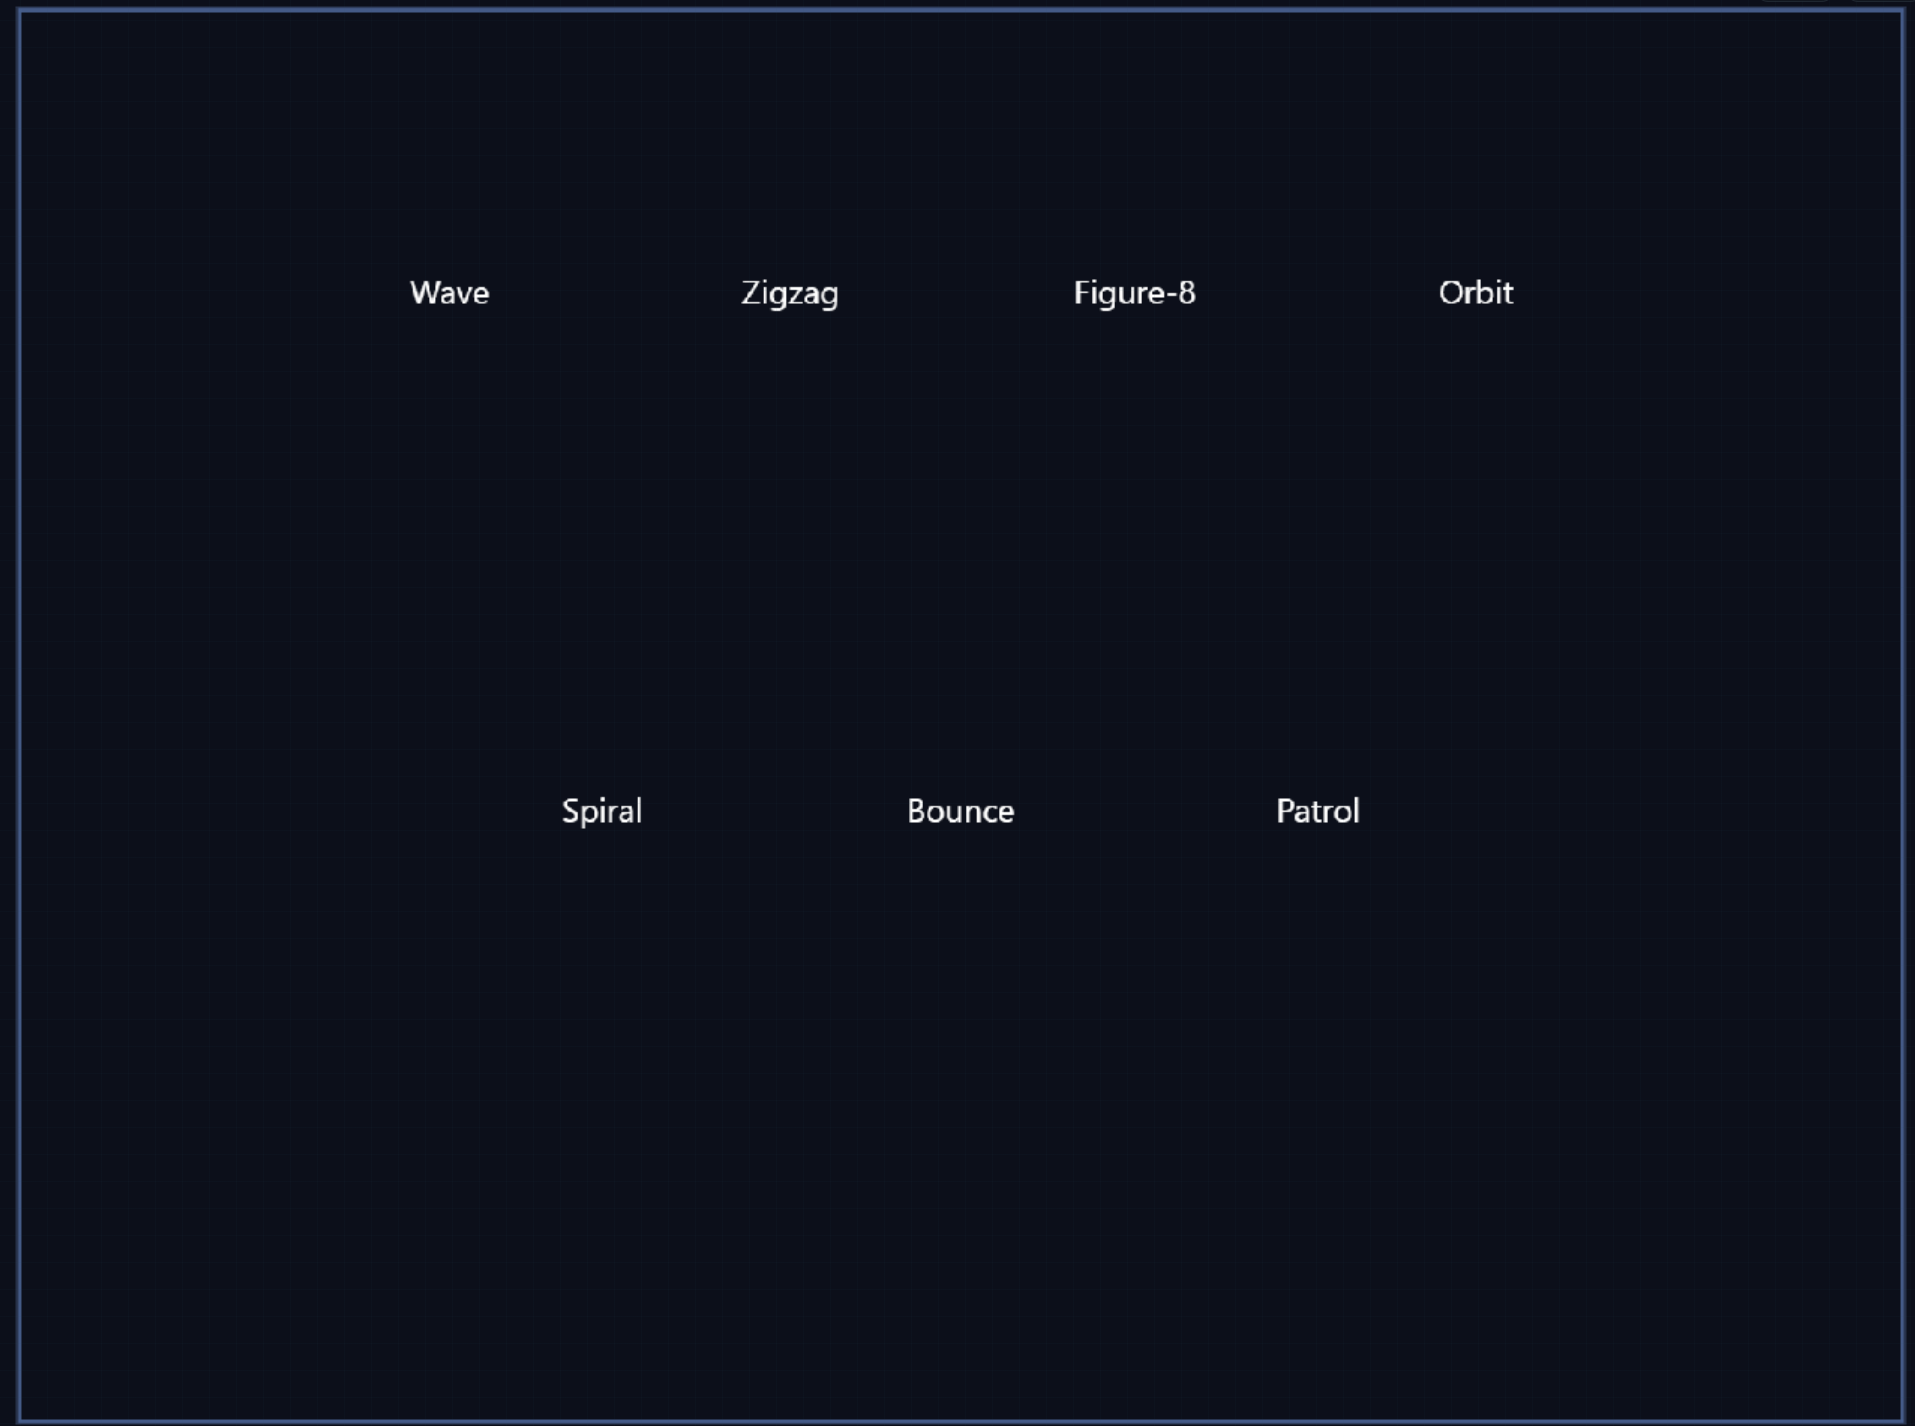
Figure 7. Titles lined up - success check.
Success check:
- There is one top row with four labels
- There is one bottom row with three labels.
Create the Sprites
In the Assets Dock under Images, scroll down to find the image labeled "ship_sidesA".
Drag the ship_sidesA image from the Dock onto the center canvas (within the blue viewport rectangle) to create a spaceship object (or "sprite") below the Wave label.
NOTE: If everything goes correctly, you will see the ship (titled "entity") also show up in the Sprites list in the left sidebar.
Hold down the Alt key and drag a copy of the spaceship sprite under each of the text labels: four ships under the labels at the top, and three ships under the labels at the bottom.
NOTE: The exact placement of your ships will be rough - you'll fix that in the next task.
Rename each of the seven ships you duplicated, starting with the ship under the
Wavelabel.a. Click the ship to highlight it
b. Hit the
F2key (Rename)c. Delete the old entity title
d. Type
Wavefollowed by theENTERkeyMove to the next sprite name in the list (
entity2) by hitting theDown Arrowon your keyboard, then follow the same procedure above to rename it.- top row:
Wave,Zigzag,Figure-8,Orbit - bottom row:
Spiral,Bounce,Patrol
- top row:
Continue until you have renamed all seven sprites to the names above, so the later pattern steps are easier to follow.
Figure 8. Scene graph Sprites list after renaming all seven ships.
Success check:
- You can see seven separate sprite entities in the scene graph.
- Their names match the list above.
- They are rough-placed beneath the text labels.
Position the Ships with Selection Tools and Layout
For the top row, drag-select the top four ships and click the
Layout…button to change their positions as a group:NOTE: A Layout pop-up window will appear.
- Under Spacing, click
Pixels, then type180in theSpacing Xbox, and hitApply Spacing X - Under Align Selection, center the ships with
Center X - Under Advanced, level the ships with
Match top edges - Under Position Selection, type
200in theYbox, then hitSet Y - Click on a blank area of the canvas to close the Layout popup.
- Under Spacing, click
For the bottom row, drag-select all three ships and use
Layout …again.- Set
Spacing Xto180and hitApply Spacing X - Center the ships with
Center X - Level the ships with
Match top edges - Set
Yto420and hitSet Y - Click on a blank area of the canvas to close the Layout popup.
- Set
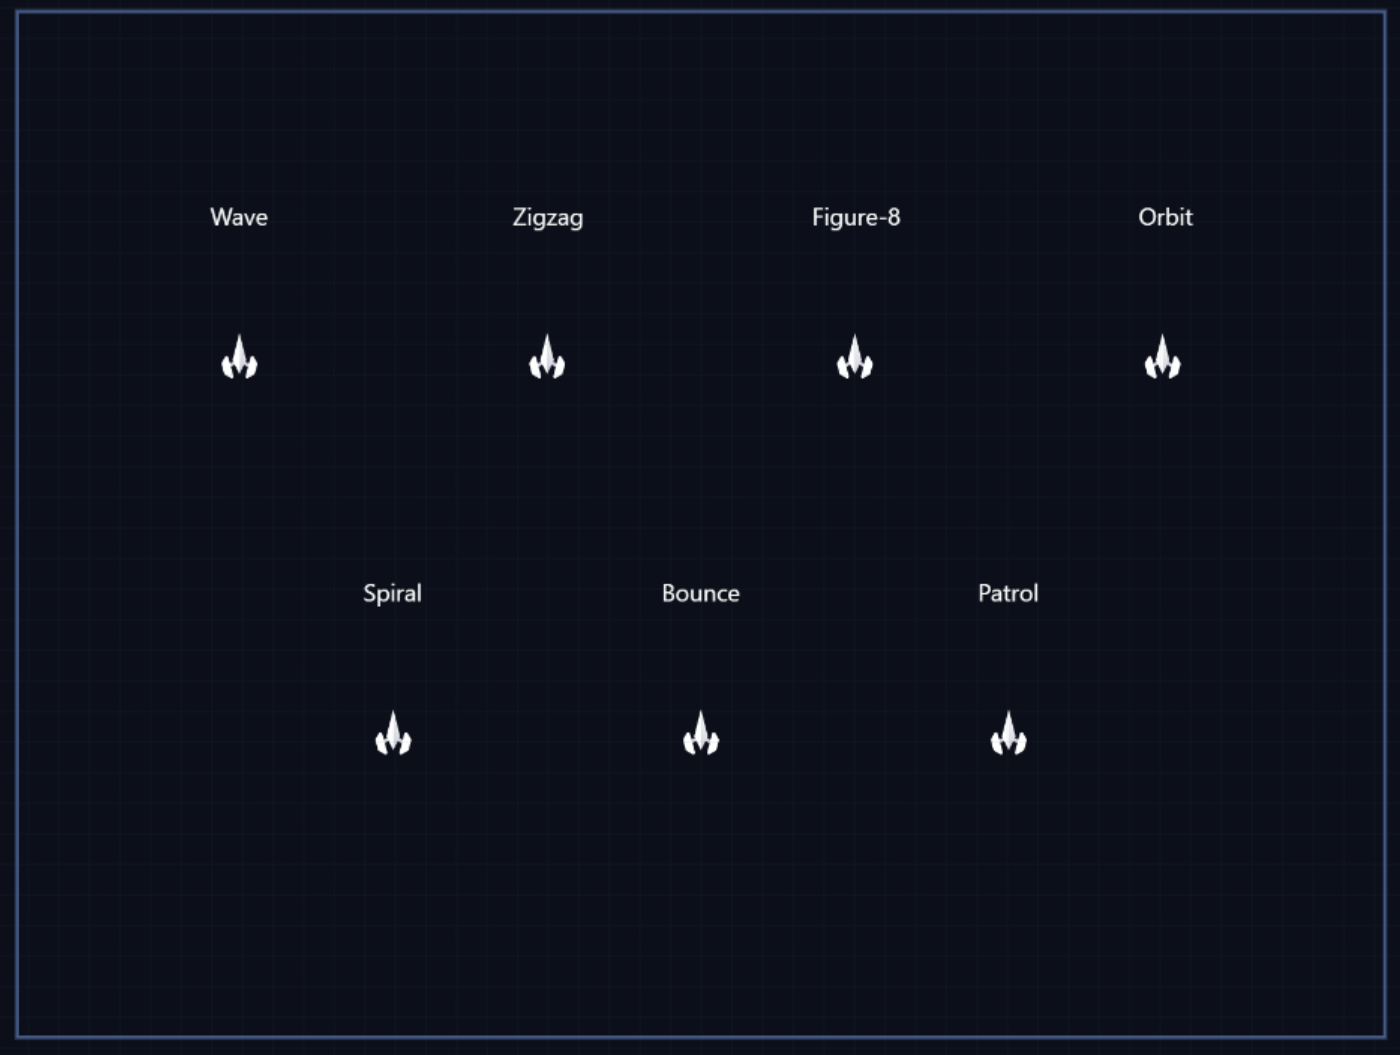
Figure 9. Ships and titles lined up - success check.
Success check:
- The four top-row ships are equally spaced and centered below their labels, and sit on same
Y = 200baseline. - The three bottom-row ships are equally spaced and centered below their labels, and sit on same
Y = 420baseline.
Attach the Movement Patterns
NOTE: The goal is to build the patterns one ship at a time in the same scene-start event flow. Take your time, and work ship-by-ship. Your progress is saved automatically, so you can return to the process later.
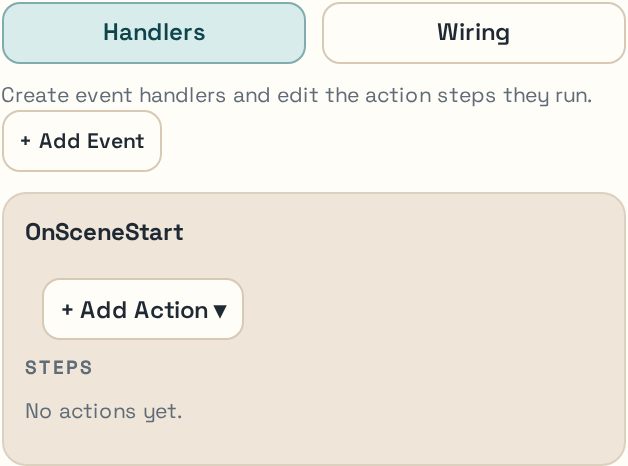
Figure 10. Actions/Events panel for authoring scene-start handlers and action steps.
Wave action
Select the ship titled
Waveon the canvas or in the scene graph.On the Inspector tab in the right sidebar, open the
Actions/Eventspanel.NOTE: If other open panels are cluttering the Inspector, you can close them with the chevron next to each panel name.
Click
+ Add Actionin the panel'sOnSceneStarthandler.NOTE: The Action Library popup will appear.
In the Action Library categories, click the
Loopsfilter.Under Actions, choose
Intro then Repeat…NOTE: The Action Library popup will close, and OnSceneStart will contain three actions: Intro, Repeat, and a nested Loop body.
Click on the Intro action name in the Steps list.
NOTE: The Inspector will switch to show
Introstep properties.Set the Intro step properties to the following:
Type = WavestartProgress = 0.75- The other defaults are fine.
Click the Back arrow in the properties panel to return to the Actions list.
Click on the
Loop Bodyname in the Steps list.NOTE: The Inspector will switch to show
Loop Bodystep properties.Set the
Loop Bodystep properties to the following:Type = Wave- The other defaults are fine.
Success check:
- Click the
Play Modebutton in the upper right of the canvas to check that the ship moves in a wave pattern.
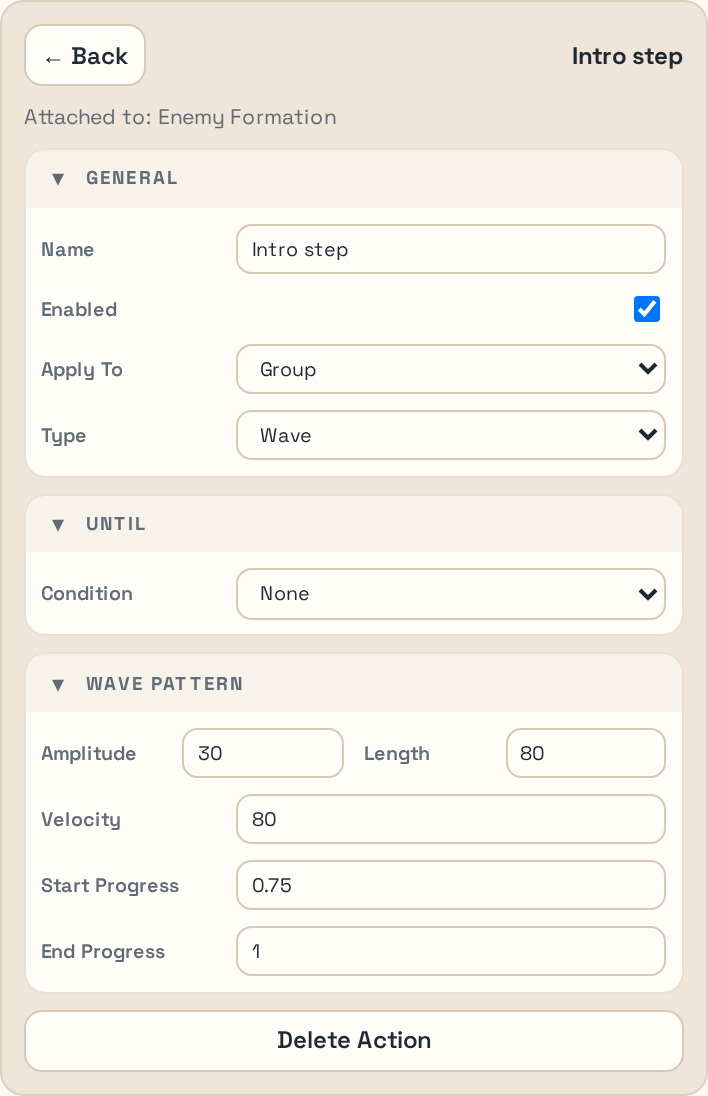
Figure 11. Wave pattern inspector with intro-step progress parameters.
Zigzag action
Select the ship titled
Zigzagon the canvas or in the scene graph.NOTE: Remember to collapse other panels besides
Actions/Eventsin the Inspector if it is too cluttered.Click
+ Add Actionin the panel'sOnSceneStarthandler under theActions/Eventspanel.NOTE: The Action Library popup will appear.
In the Action Library categories, click the
Loopsfilter.Under Actions, choose
Repeat With Children…Leave
Children = 2, setChild Type = Zigzag Patternand click theCreatebutton.NOTE: The Inspector will switch to show the
Repeataction properties.Set the Loop properties to the following:
Name = Loop- Make sure the
Countproperty stays empty, so it repeats forever. - The other defaults are fine.
- Click the Back arrow in the properties panel to return to the Actions list.
Click on the second
Zigzag Patternin the Steps list.NOTE: The Inspector will switch to show
Zigzagstep properties.Set the second
Zigzagstep properties to the following:Width = -30Height = -15- The other defaults are fine.
- Click the Back arrow in the properties panel to return to the Actions list.
Click the
...next to the Loop in the Actions list.NOTE: A popup menu will appear below.
Click
+ Add Action Abovein the popup menu.NOTE: The Action Library will popup above the Loop action.
Click
Move Byin the Action library to add it to the Actions list.Click the
Move Byaction in the Actions list to set its properties:Name = OffsetΔx = -15Δy = -30
Success check:
- Click the
Play Modebutton in the upper right of the canvas to check that the ship moves in a zigzag pattern. - Click the
Edit Modebutton to resume editing.
Figure-8 action
Select the ship titled
Figure-8on the canvas.Click
+ Add Actionin the panel'sOnSceneStarthandler under theActions/Eventspanel.NOTE: The Action Library popup will appear.
In the Action Library categories, click the
Loopsfilter.In the Actions list, click
Repeat with Children…NOTE: The Actions Library will close, and a popup menu in the
OnSceneStartmenu will appear.Set
Children = 1andChild Type = Figure-8 Patternin the popup menu, then click theCreatebutton.Set the
Repeatstep properties in the Inspector to the following:Name = Loop- The other defaults are fine.
Success check:
- Click the
Play Modebutton in the upper right of the canvas to check that the ship moves in a figure-8 pattern. - Click the
Edit Modebutton to resume editing.
Orbit action
Select the ship titled
Orbiton the canvas.In the Inspector, expand the Transform panel (if it's not already visible) by clicking the chevron next to its name.
Check the box labeled
Flip Y.NOTE: The ship will flip upside down.
Click the Transform panel chevron again to close it.
Click
+ Add Actionin the panel'sOnSceneStarthandler under theActions/Eventspanel.NOTE: The Action Library popup will appear.
In the Action Library categories, click the
Loopsfilter.In the Actions list, click
Repeat with Children…NOTE: The Actions Library will close, and a popup menu in the
OnSceneStartmenu will appear.Set
Children = 1andChild Type = Orbit Patternin the popup menu, then click theCreatebutton.
Success check:
- Click the
Play Modebutton in the upper right of the canvas to check that the ship moves in an orbiting pattern. - Click the
Edit Modebutton to resume editing.
Spiral action
Select the ship titled
Spiralon the canvas.Click
+ Add Actionin the panel'sOnSceneStarthandler under theActions/Eventspanel.NOTE: The Action Library popup will appear.
In the Action Library categories, click the
Loopsfilter.In the Actions list, click
Repeat with Children…NOTE: The Actions Library will close, and a popup menu in the
OnSceneStartmenu will appear.Set
Child Type = Spiral Patternin the popup menu, then click theCreatebutton.Click the Back arrow in the properties panel to return to the Actions list.
Click on
Child 2in the Actions list.Set the
Child 2properties to:Direction = InwardFlip Y = Checked- The other defaults are fine.
Success check:
- Click the
Play Modebutton in the upper right of the canvas to check that the ship moves in a spiral pattern. - Click the
Edit Modebutton to resume editing.
Bounce action
Select the ship titled
Bounceon the canvas.Click
+ Add Actionin the panel'sOnSceneStarthandler under theActions/Eventspanel.NOTE: The Action Library popup will appear.
In the Action Library categories, click the
Movementfilter.Add a
Bouncestep and set:Name = BounceBoxVelocity X = 100- In the
Boundspanel for the same ship:Switch
Boundsedit mode toCenter/SpanSet
± X Span = 50Set
± Y Span = 60NOTE: You will see the bounding box around the ship expand, indicating the bounce area.
Click the Back arrow in the properties panel to return to the Actions list.
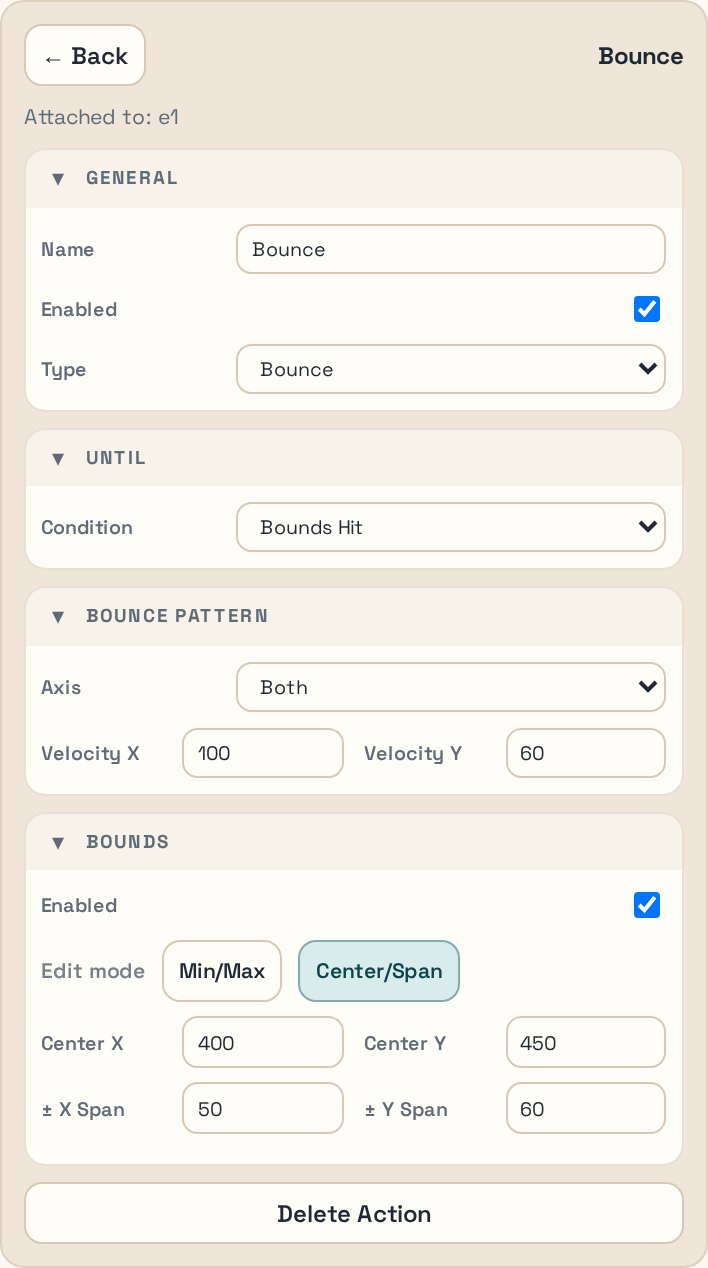
Figure 13. Bounce pattern with the bounds helper in Center/Span mode.
Success check:
- Click the
Play Modebutton in the upper right of the canvas to check that the ship bounces around in the defined box. - Click the
Edit Modebutton to resume editing.
Patrol action
Select the ship titled
Patrolon the canvas.Click
+ Add Actionin the panel'sOnSceneStarthandler under theActions/Eventspanel.NOTE: The Action Library popup will appear.
In the Action Library categories, click the
Movementfilter.Add a
Patrolstep and set:Velocity X = 80- In the
Boundspanel for the same ship:Switch
Boundsedit mode toCenter/SpanSet
± X Span = 40Switch
Boundsedit mode toMin/MaxSet
Min Y = 400Set
Max Y = 500NOTE: You will see the bounding box around the ship expand, indicating the patrol bounds.
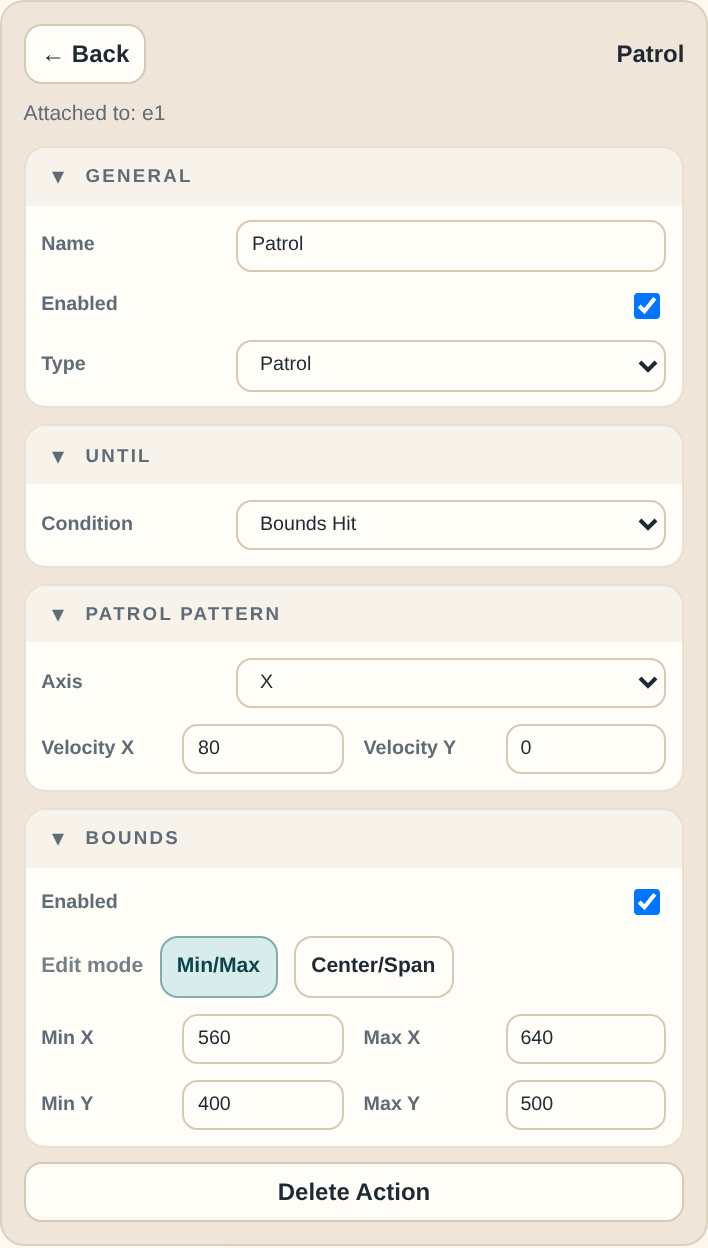
Figure 14. Patrol pattern with the final bounds values visible in Min/Max mode.
Success check:
- Every ship shows a handler/action flow in the editor.
BounceandPatrolhave their bounds configured, not just the pattern action itself.
Add Music to the Demo
Click on a blank part of the Canvas.
NOTE: The Inspector for the canvas itself will appear in the right sidebar.
In the Inspector, expand the Audio panel (if it's not already visible) by clicking the chevron next to its name.
Click on the Music dropdown box and select a song from the Demo Pack, like "sb-indreams-chosic-com" or whichever one you like.
Adjust the Volume setting if you like.
Run the Demo in Play Mode
Toggle into Play mode with Tab or the toolbar button, and let the scene run long enough to verify all seven motions.

Figure 15. Toolbar region with Play/Edit toggle and status controls.
Look for these outcomes:
- all seven ships animate simultaneously
- labels remain static
- no ship leaves the scene unexpectedly
BounceandPatrolstay inside their intended travel areas
If a ship is motionless, go back to its handler and confirm the action flow exists and that the pattern settings were applied to the correct ship.
Success check:
- The scene behaves like a motion sampler rather than a static layout.
What to Do Next
Continue to Publish to GitHub Pages to turn the saved demo into a hosted playable page.